We saw the the Splash Test Dummies (Trash Test Dummies) and they were so funny and seriously talented!
The award-winning circus trio Jack Coleman, Jamie Bretman and Simon Wright are three lifeguards who will meet you out in the line and make sure you have sun protection before they set out to save you with their trademark blend of slapstick side-splitting circus, acrobatic, juggling, stunt work and imaginative comedy.
Young and old were laughing until our cheeks hurt, there are bucket loads of audience participation, songs like the Baywatch theme song, Octopus’s Garden, Rubber Ducky andI’m too Sexy, unicycles, shadow puppetry, ping pong balls and water! We promise that it’s family friendly and the kids will LOVE it!
We have a special code for you! When buying tickets, type in SPLASH for 2 for 1. Happy days!
When: 1pm, Saturday 31 March – Sunday 15 April (Shows every day except Wednesday 11th April)
Where: Melbourne Town Hall – Lower Town Hall, Swantston Street, Melbourne Cost: $20-25, click here to book
This post is in collaboration with Ryobi Australia
Alegria and Isaac love to play outside! There is nothing better than seeing their imaginations run wild whilst getting a great big dose of fresh air and being in nature! In an age where kids are spending more time on devices, we have been making a concerted effort to swap screen time for green time. To achieve this, we we visit national parks in our local area, go to playgrounds and spend time in our garden.
We have put aside a little area in the backyard, under some trees and in amongst the flowers, for a fairy garden. One of Alegria’s favourite things to do in the fairy garden is to play with our homemade wooden story discs. Wooden story discs, similar to story stones, are great as story-telling prompts for narrative play. They are fun, easy to make and your kids will love them!
If this is your first DIY project, here are my Top 5 Tips to get you on your way! You don’t need to feel intimidated by DIY, there are many projects that require very little in the way of skill, tools or materials.
GEORGINA’S TOP DIY TIPS!
Pick a simple DIY design – you don’t want to be overwhelmed and never finish. Save the instructions or take a screen shot on your phone for easy reference.
Make sure you get some essential safety gear – safety glasses and hearing protection are a must. Gloves are handy as well!
Ask for help – expert advice is available at stores like Bunnings Warehouse or local hardware stores. Ask your friends, you will be surprised at the hidden skills people have!
Get prepared – make sure you have all the tools and materials you need before you begin. You don’t want to have to stop half way to pop down to the shops again!
Set aside time to DIY – I often work on my projects when the kids are playing in the backyard. They come and check out what I am doing, have a go (if it’s safe) and then go back to playing. It’s amazing how much knowledge they pick up by observing you and participating, where appropriate.
HOW TO MAKE WOODEN STORY DISCS:
As I said, wooden story discs are easy to make, and even easier when you have the right tools!
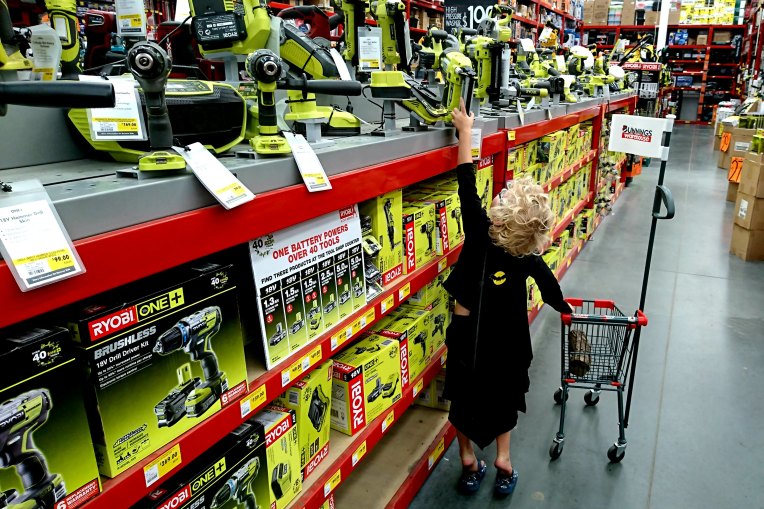
For the wooden story discs, we stopped by Bunnings and picked out some Ryobi Tools to make the job easier. Isaac was in little boy heaven!
Obviously we had a specific idea of what we were using the tools for, however, we have found that we use them all the time for various DIY jobs and for even lighting the Weber BBQ!
If you are a beginner, don’t be scared! Each tool comes with an instruction manual and there are also online tutorials on how to use all the Ryobi tools on Ryobi TV.
Various rubber stamps (we chose fairy themed but you can choose anything!)
Versamark ink
Embossing powder
DIY STEPS:
STEP 1: MEASURE TWICE, CUT ONCE!
Before cutting your timber, do a quick measurement to make sure your stamps will fit! Mark out where you want to make your cuts along the timber.
STEP 2: GET CUTTING!
Always remember your safety protection (safety glasses and hearing protection at a minimum) and get cutting! The Ryobi 2000W 254mm Slide Compound Mitre Saw With Laser was easy to use, and I highly recommend getting the stand. The saw has just enough safety precautions that you know you won’t cut off a finger (always a bonus!) and not too many that makes using it cumbersome. The laser makes cutting a straight line, exactly where you want it, a breeze!
STEP 3: SAND AND SEE!
Now that you have your little bits of timber, it’s time to shape them! You could use a pencil to mark out the basic shape you want your discs to be or be like us and see what shape it becomes! Alegria really loved helping out with this task. With the right safety equipment and supervision, there is no reason not to include your kids in your DIY tasks!
We used the Ryobi 200W Corded Multi Tool Kit sanding attachment and rounded the corners off the timber pieces. We used a vice to hold our discs (and an old sock as the vice was marking our timber!) and smoothed all of the edges so that they were safe for even the littlest of fairies.
The Multi Tool is such a handy tool to have, although in hindsight, I would have used the Ryobi 370W Belt and Disc Sander as this was a job that took a long time! The Belt and Disc Sander would definitely be faster!
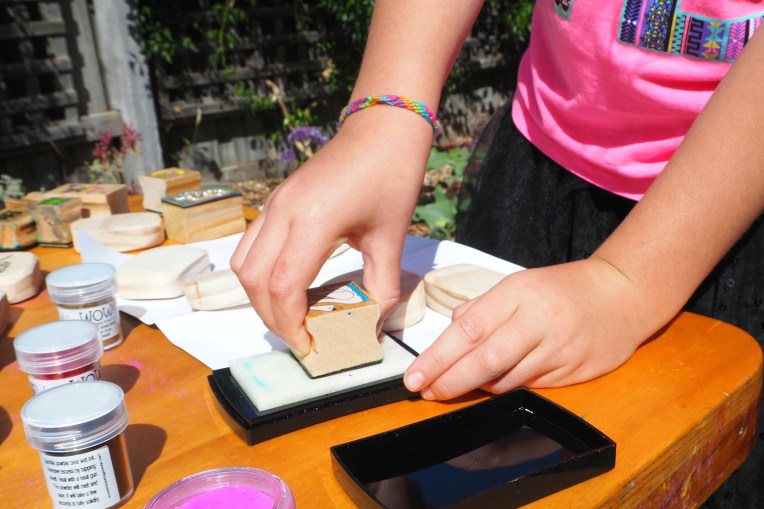
STEP 4: GET SOME INK!
Using your chosen rubber stamps, coat the stamp with Versamark ink and stamp it onto your wooden disc. Make sure you are very careful and don’t move the stamp once it is on the wood or the embossing powder will stick to it and ruin your image!
STEP 5: SPRINKLE FAIRY DUST (EMBOSSING POWDER)!
As soon as you have stamped your wooden disc, you need to sprinkle embossing powder on it. You need to be quick as you don’t want the ink to dry as your powder won’t stick!
Don’t waste your powder – pour the excess back into your container or use a piece of paper folded in half as a funnel.
STEP 6: TURN UP THE HEAT!
Activating the embossing powder is for adults only! Let me say that again! The heat gun is HOT so the kids need to step away!
Now that they are at a safe distance, heat the embossing powder until it begins to change. It sort of bubbles and melts. The Ryobi 2000W Corded Heat Gun has a red light so that you can target specific spots and you don’t burn anything. The silver end gets hot, so be careful after you have finished to avoid burns. The gun itself is easy to use and as I said earlier Tim uses it to light his Weber BBQ all the time so it is a handy addition to your tool box.
STEP 7: ENJOY!
The kids can use the wooden story discs however they chose! There’s no right or wrong way to play!
If you are looking for ideas, the kids can use the discs for:
Math Play: The discs can be used in sorting or grouping activities. Children can count how many people (or fairies), animals or food items they have or make shapes by lining up the discs into circles, squares and even in long lines.
Story Telling: Children can tell a story based on a single image or use another disc to further the story. Children can do this independently or as a group taking it in turns to tell a story or add another sentence to the group story.
Imaginative Play: The discs don’t have to be used exclusively in the garden, they can be used as:
obstacles on the car or train track
characters in the dollhouse
guests at a tea party
Of course, there are many ways your children will find to play with these wooden story discs and you can put what ever images you like on them so they can be tailored to your child’s interests.
Acknowledgements – This post was brought to you in collaboration with Ryobi Australia. Kidding Around Australia were supplied with the tools required for this project and as always our opinions are our own.
Please note all details quoted are correct at the time of publishing. All details are subject to change without notice and Kidding Around Australia takes no responsibility for information contained in this post. Please check the appropriate website to ensure that information is still correct and current.
ALL PHOTOGRAPHIC IMAGES ON THE KIDDING AROUND AUSTRALIA WEBSITE ARE THE EXCLUSIVE PROPERTY OF THE KIDDING AROUND AUSTRALIA AUTHORS. ALL IMAGES ARE SUBJECT TO COPYRIGHT AND CANNOT BE USED WITHOUT WRITTEN PERMISSION FROM KIDDING AROUND AUSTRALIA.
It’s time to start preparing for your next big adventure! Always up for a holiday, around here we like to take a break during winter and head to the snow. The kids started snowboarding last winter and we are looking forward to taking them again this year for some more wintry fun!
Now, of course, this love of the snow doesn’t come from their mother! Tim is completely to blame for this. Tim has been snowboarding ever since he was 14 (which is *cough* 30 years) and spent much of his teen’s, 20’s and 30’s snowboarding at Mount Hotham, Mount Buller, Falls Creek and the Canadian resorts around Banff and Whistler.
It was during this time in Canada that Tim started dreaming of a custom snowboard, a board that would ride well, holding its edge at speed without losing too much flex, but still be playful and comfortable to ride all day.
Years later, Tim’s wishes have been granted after he discovered a new custom snowboard manufacturer based in Victoria, Australia who were able to tick all the boxes, and offer a genuine custom board – built as a one of a kind just for him, his body and his riding style.
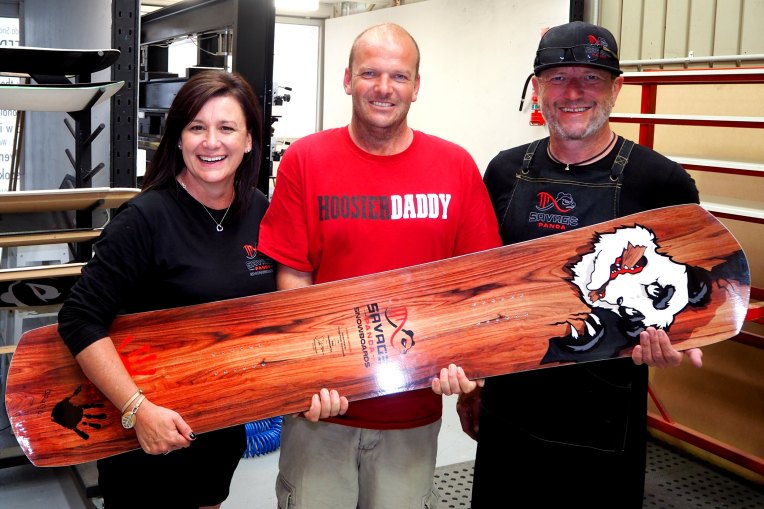
Simon and Kate founded Savage Panda Snowboards in 2017 and have quickly gained an amazing reputation for their one-off, fully customised snowboards.
“I was frothing to get my fully custom board from Savage Panda Snowboards. The board is awesome and performs perfectly in the POW in Japan! Simon and Kate put so much effort into helping me design this board, guiding me through the process of the shaping and the whole design. The performance of the board is the main thing – super, super fast and it handled like a dream in the powder.” – Robbie McEwen, triple winner of the Tour de France’s green jersey sprinters’ classification.
What’s exciting about Savage Panda, is that their idea of ‘custom’ is not just designing your own artwork, it also includes all your personalised performance preferences. If you have done any research yourself, we’re sure that you have come across some snowboard manufacturers making what they pass-off as ‘custom’ but really; they just tinker with the edges of the board in terms of length, width and camber. With some of them, you can’t even design your own artwork! That’s not custom to us!
What we love about Savage Panda Snowboards is that every board is personally designed and shaped from the core out for each and every snowboarder. This board is yours and yours only. A one of a kind, and the way we look at it, a “forever board”. It’s a board that you’ll want to keep forever and if you end up getting another Savage Panda snowboard; you’ll keep your original as a piece of art for your wall.
THE BUILD PROCESS
QUESTIONNAIRE – The first stage in building your very own custom snowboard is to fill out an online questionnaire, where you are asked your physical characteristics (height, weight, etc.) as well as your ability, riding style, stance, where you like to ride and terrain preferences. There are 29 ‘drill down’ questions that mean the Savage Panda team get to know your riding almost better than you know yourself!
You are also asked about what boards you have ridden before and what you look for in a board, such as forgiveness, edge control, speed and flex. The questionnaire is designed to unlock who you are as a snowboarder so that Simon and Kate can build the perfect board for YOU. Your board, an extension of your DNA.
Tim really enjoyed the process as it made him think about what he wanted from a snowboard – characteristics that you just can’t get from an off-the-rack board. Oh, and don’t worry if you are a beginner, buying a custom board will ensure that you won’t waste money on a board that may be too advanced for you or not suited to your style. A custom board that will improve your riding faster than any off-the-shelf board will.
BOARD DESIGN CONSULTATION WITH SIMON – You are able to do this consultation via a phone call or Skype, however Tim chose to travel to Queenscliff to have his design consultation with Simon in person (and over a beer). After analysing his questionnaire, Simon had already created a fantastic concept for Tim’s custom board.
The ideas and advice Simon is able to come up with are absolutely priceless, he really understood Tim’s riding preference and what he had come up with, Tim was rapt!
Simon’s next step was to consult with another designer in Canada to make sure they were making the perfect board for TIM. This is where they discussed shape preference, camber preference and length of the board. There is so much detail that has to be spot on to give Tim the perfect ride.
Simon was aware of our plans to travel to Japan so he has designed a board that would firstly perform in Australian conditions and when in Japan, will have no problem in the deep powder he strives to ride.
Simon then sent through via email the design plans for final approval.
ART DESIGN CONSULTATION WITH KATE – Savage Panda use a number of artists from around the world to work with you on your top sheet artwork. It is entirely up to you what you put on it, if you already have a photo or image you love you can use that, otherwise you can design something new.
Tim had an idea for his artwork and after consultation with Kate, she decided on the best artist to use who specialises in free hand drawing. After two or three emails with Kate and exchanging “this puppy is kinda what I want” photos, Kate was able to pull from Tim’s brain the design and able to explain it to Vyktor on the other side of the world!
We also wanted to incorporate Alegría and Isaac into the process, so we had them write their names and got their handprints to put on the tail of the board. We then took photos of these and sent them through to Kate.
When you are designing your top sheet, you also have to name your board because every board is unique! In the centre of your artwork, there is a template with a unique serial number along with the board’s name and owner’s name that is signed by Simon with the date the board was built.
The artwork design that came back still amazes us! It is exactly what Tim was after, a one off piece of artwork just for him. He is so, so happy.
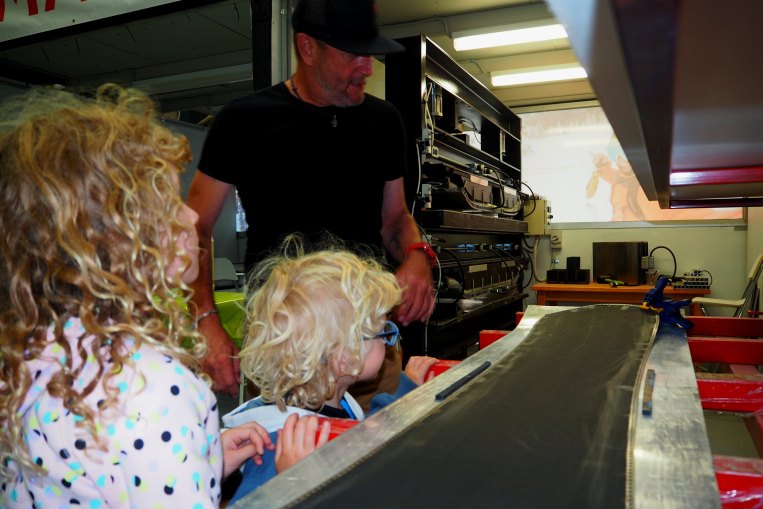
WITNESS YOUR BOARD BEING BUILT – Simon and Kate welcome anyone who orders a Savage Panda Snowboard to come and witness it coming to life and being made in their Queenscliff headquarters.
Click HERE to watch our behind the scenes video on YouTube!
For Tim, to be a part of the Savage Panda family and to be asked to come to the headquarters whilst his custom board was built, was a dream come true. One thing you will realise when you purchase a Savage Panda board is that Simon and Kate are so welcoming, encouraging and really treat you like family. It wasn’t just Tim either, we were all welcomed and loved watching “Dadda’s” board come to life!
We would encourage you to go, get your hands dirty and really be a part of it, if you have the chance. The final stage of the build process takes two days, so keep that in mind.
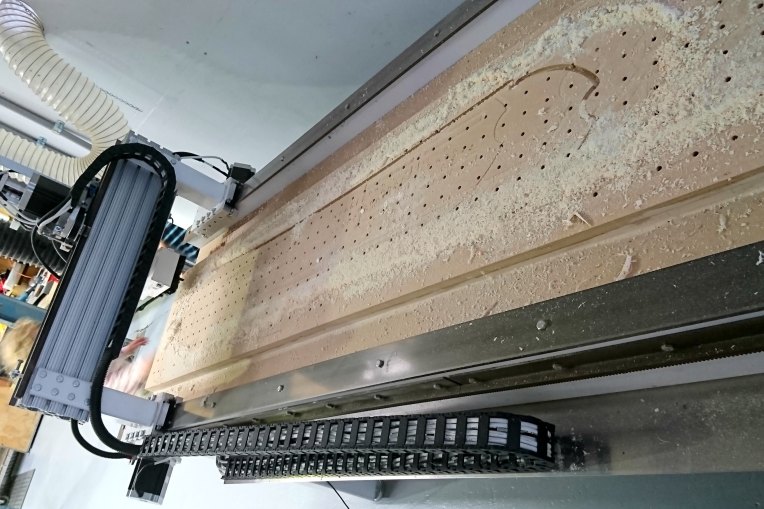
On the first day you will see the board put together, Simon and Kate have gone to ridiculous lengths to ensure that each board is built out of the best quality materials sourced from all over the world, which you would never find in an off-the-rack-board.
The core is Canadian Aspen, the base is from Austria, the edges are from Germany, the dampening or answer sheet is from Japan, the top sheet is from Austria along with reinforcements, fibre glass or carbon fibre.
Resin is used between each layer and the board is then put in a heat press for 40-60 minutes before being left to cure overnight.
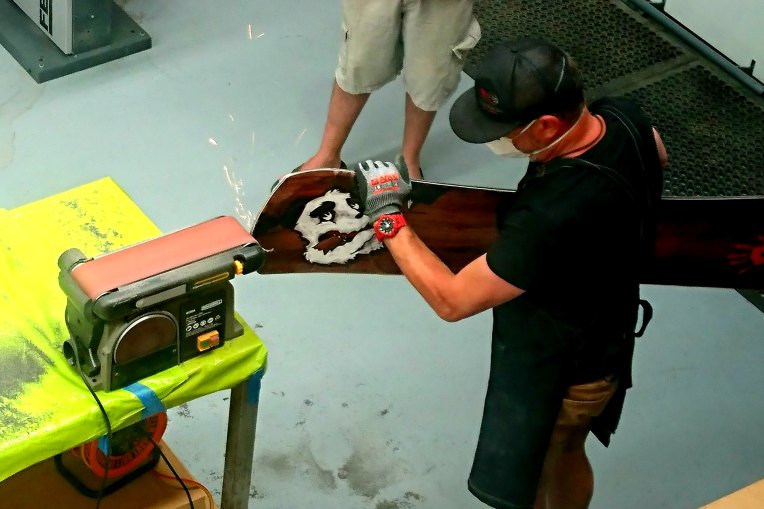
On day 2, you get to witness an artist at work when Simon cuts your board out and puts all the finishing touches on your board. Sparks will fly, both in the factory and in your heart!
If all of this sounds amazing to you, and if you are into snowboarding, then we know it does – you will have one question. “What is this going to cost me?” Some people have said they’ve been surprised by the cost. We were too. To get all the personalisation, all the attention to detail, all the thoroughness of their questionnaire as well as their one-on-one design consultations, the intimate way they get to know you and truly hand craft a board just to suit you as a ‘one-off’ creation made from the best materials in the world that showcases your exact artwork, backed by their ballsy guarantee, we actually thought their price would be a lot higher!
Especially when these guys told us that the raw cost of the world class materials they use to build their boards is usually more than RRP of some of the mass manufacturer production boards! So yeah, you should be surprised by the cost – it really could be a lot higher. If you want to find out more about YOUR custom board, click HERE.
Whilst we are busy planning for our trip to the Victorian Alps this winter, and Japan in January 2019 we wanted to share some feedback with you from other happy Savage Panda customers. Just in case you needed some more information from snowboarders who are already living the dream.
“The ease at which they ride in powder is amazing, almost like they’re floating. We both commented on this independently and I have to say that I didn’t feel like I was leaning back and loading the back leg much at all. Jen’s loving the flex of hers and it’s definitely more flexible than her High Society. Mine feels like an aggressive all-mountain slayer, i.e. stiff and responsive. It’s an amazing board to carve on too (on the groomers) when there’s no fresh around. It performs exceptionally well on the rough stuff too – very forgiving and super stable. Oh, and one thing I really love is when I hit a natural kicker and land in deep pow, I just ride out of it! On my old boards it was always touch and go and often I just bury myself on the landing and crash! So pretty awesome there.” – Mick and Jen from The Snow Chasers
“OMG totally in love with my Soul Panda made by the amazing team at Savage Panda Snowboards. I asked for something with a decent amount of camber, yet still playful. They managed to make the perfect board. Lots of camber, the perfect amount for me. Nice and super responsive. Edges hold like nothing I’ve ridden before, even on the world renowned ice of Ruapehu! At speed it feels stable as, no chatter at all, yet when I want to play around and do little jumps and spins it’s soft and playful.” – Andy Harper
“My Savage Panda board eats up the Powder like no other board I have ever ridden and floating on that dry soft Jap Pow is the best feeling. It’s performance in champagne Powder is also faster, more responsive and yet somehow still stable compared to any other board I have ridden. With everything, when you design a board to do one thing, you should have to compromise on other things. I was very surprised to get this board into steep moguls, and it handled them at a speed that to be honest, scared me. As for steep groomed runs, this board is fast. Jumps – I am not a big park rider, but do enjoy the occasional natural jump when the opportunity arises. This board has heaps of spring, and was very stable on the landing, although every landing I did was into pretty soft forgiving snow.” – Darren Rathbone
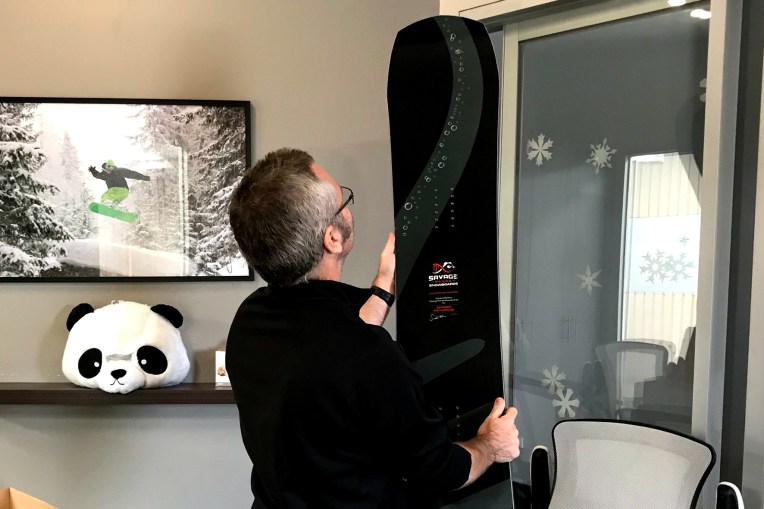
Rest assured, we will be back with another post telling you all about Tim’s new custom ride – aptly named, Kidding Around.